funcmain() { var p = Person{ Name: "Hao Chen", Sexual: "Male", Age: 44, }
PrintPerson(&p) p.Print() }
你更喜欢哪种方式呢?在 Go 语言中,使用“成员函数”的方式叫“Receiver”,这种方式是一种封装,因为 PrintPerson()本来就是和 Person强耦合的,所以,理应放在一起。更重要的是,这种方式可以进行接口编程,对于接口编程来说,也就是一种抽象,主要是用在“多态”,这个技术,在《Go语言简介(上):接口与多态》中已经讲过。在这里,我想讲另一个Go语言接口的编程模式。
type Shape interface { Sides() int Area() int } type Square struct { lenint } func(s* Square) Sides() int { return4 } funcmain() { s := Square{len: 5} fmt.Printf("%d\n",s.Sides()) }
$ wasme build precompiled target/wasm32-unknown-unknown/release/hello_world.wasm --tag webassemblyhub.io/amoyw/hello_world:v0.0.1 $ wasme list
NAME TAG SIZE SHA UPDATED webassemblyhub.io/amoyw/hello_world v0.0.1 1.9 MB 2e95e556 28 Nov 20 14:27 CST
wasme build三种方式,
1 2 3 4 5 6
$ wasme build -h
Available Commands: assemblyscript Build a wasm image from an AssemblyScript filter using NPM-in-Docker cpp Build a wasm image from a CPP filter using Bazel-in-Docker precompiled Build a wasm image from a Precompiled filter.
{ "headers":{ "X-Hello":"Hello world from localhost:8080" } }
wasme deploy三种方式
1 2 3 4 5 6
$ wasme deploy -h
Available Commands: envoy Run Envoy locally in Docker and attach a WASM Filter. gloo Deploy an Envoy WASM Filter to the Gloo Gateway Proxies (Envoy). istio Deploy an Envoy WASM Filter to Istio Sidecar Proxies (Envoy).
namespace/wasme created configmap/wasme-cache created serviceaccount/wasme-cache created serviceaccount/wasme-operator created clusterrole.rbac.authorization.k8s.io/wasme-operator created clusterrole.rbac.authorization.k8s.io/wasme-cache created clusterrolebinding.rbac.authorization.k8s.io/wasme-operator created clusterrolebinding.rbac.authorization.k8s.io/wasme-cache created daemonset.apps/wasme-cache created deployment.apps/wasme-operator created
注意看下 Pod 是否成功,如果READY 1/2可能是istio-proxy没有启动,测试时这里遇到问题wasme-cache经常失败,可能是网络问题,并且失败后不能续传。可以进入 Pod 看缓存的尺寸是否和hello_world.wasm尺寸一致,缓存路径/var/local/lib/wasme-cache/,不一致就等缓存完成后再测试。
http://{ingress-host}:{port}/headers
1 2 3 4 5
{ "headers":{ "X-Hello":"Hello world from {ingress-host}" } }
Netem 是 Linux 2.6 及以上内核版本提供的一个网络模拟功能模块。该功能模块可以用来在性能良好的局域网中,模拟出复杂的互联网传输性能。例如:低带宽、传输延迟、丢包等等情况。使用 Linux 2.6 (或以上) 版本内核的很多 Linux 发行版都默认开启了该内核模块,比如:Fedora、Ubuntu、Redhat、OpenSuse、CentOS、Debian 等等。
TC 是 Linux 系统中的一个用户态工具,全名为 Traffic Control (流量控制)。TC 可以用来控制 Netem 模块的工作模式,也就是说如果想使用 Netem 需要至少两个条件,一是内核中的 Netem 模块被启用,另一个是要有对应的用户态工具 TC 。
另一个常见的网络异常是因为丢包,丢包会导致重传,从而增加网络链路的流量和延迟。Netem 的 loss 参数可以模拟丢包率,比如发送的报文有 50% 的丢包率(为了容易用 ping 看出来,所以这个数字我选的很大,实际情况丢包率可能比这个小很多,比如 0.5%):
1 2 3 4 5 6 7 8
$ tc qdisc change dev eth0 root netem loss 50% $ ping dev-node-02 PING dev-node-02 (192.168.100.212) 56(84) bytes of data. 64 bytes from dev-node-02 (192.168.100.212): icmp_seq=1 ttl=64 time=0.290 ms 64 bytes from dev-node-02 (192.168.100.212): icmp_seq=4 ttl=64 time=0.308 ms 64 bytes from dev-node-02 (192.168.100.212): icmp_seq=5 ttl=64 time=0.221 ms 64 bytes from dev-node-02 (192.168.100.212): icmp_seq=8 ttl=64 time=0.371 ms 64 bytes from dev-node-02 (192.168.100.212): icmp_seq=9 ttl=64 time=0.315 ms
“Resharding” means migrating the data in one slot from one redis server to another, usually happens while increasing/decreasing the number of redis servers.
关于 HOT KEY, HOT KEY 很影响 Codis/Redis 的性能,这点如果你监控不到位,你就得花一些力气去找到底是哪组出了问题,再 monitor 看看找出是哪个应用干的,比较费时费力,所以在交付 rd 上线时, 我们就严肃声明坚决不允许存在 HOT KEY,宁可使用笨方法多消耗一些内存,也要降低线上故障的风险。
关于 BIG KEY, 这点风险更为巨大:
由于 Codis 支持 “resharding without restarting cluster”,如果迁移失败,所导致的后果也是不可简单衡量的。Redis 是串行提供服务的,所以当迁移该 BIG KEY 时,其他的请求就会被 BLOCK 住,这点是十分危险的,访问该组的请求皆会失败。
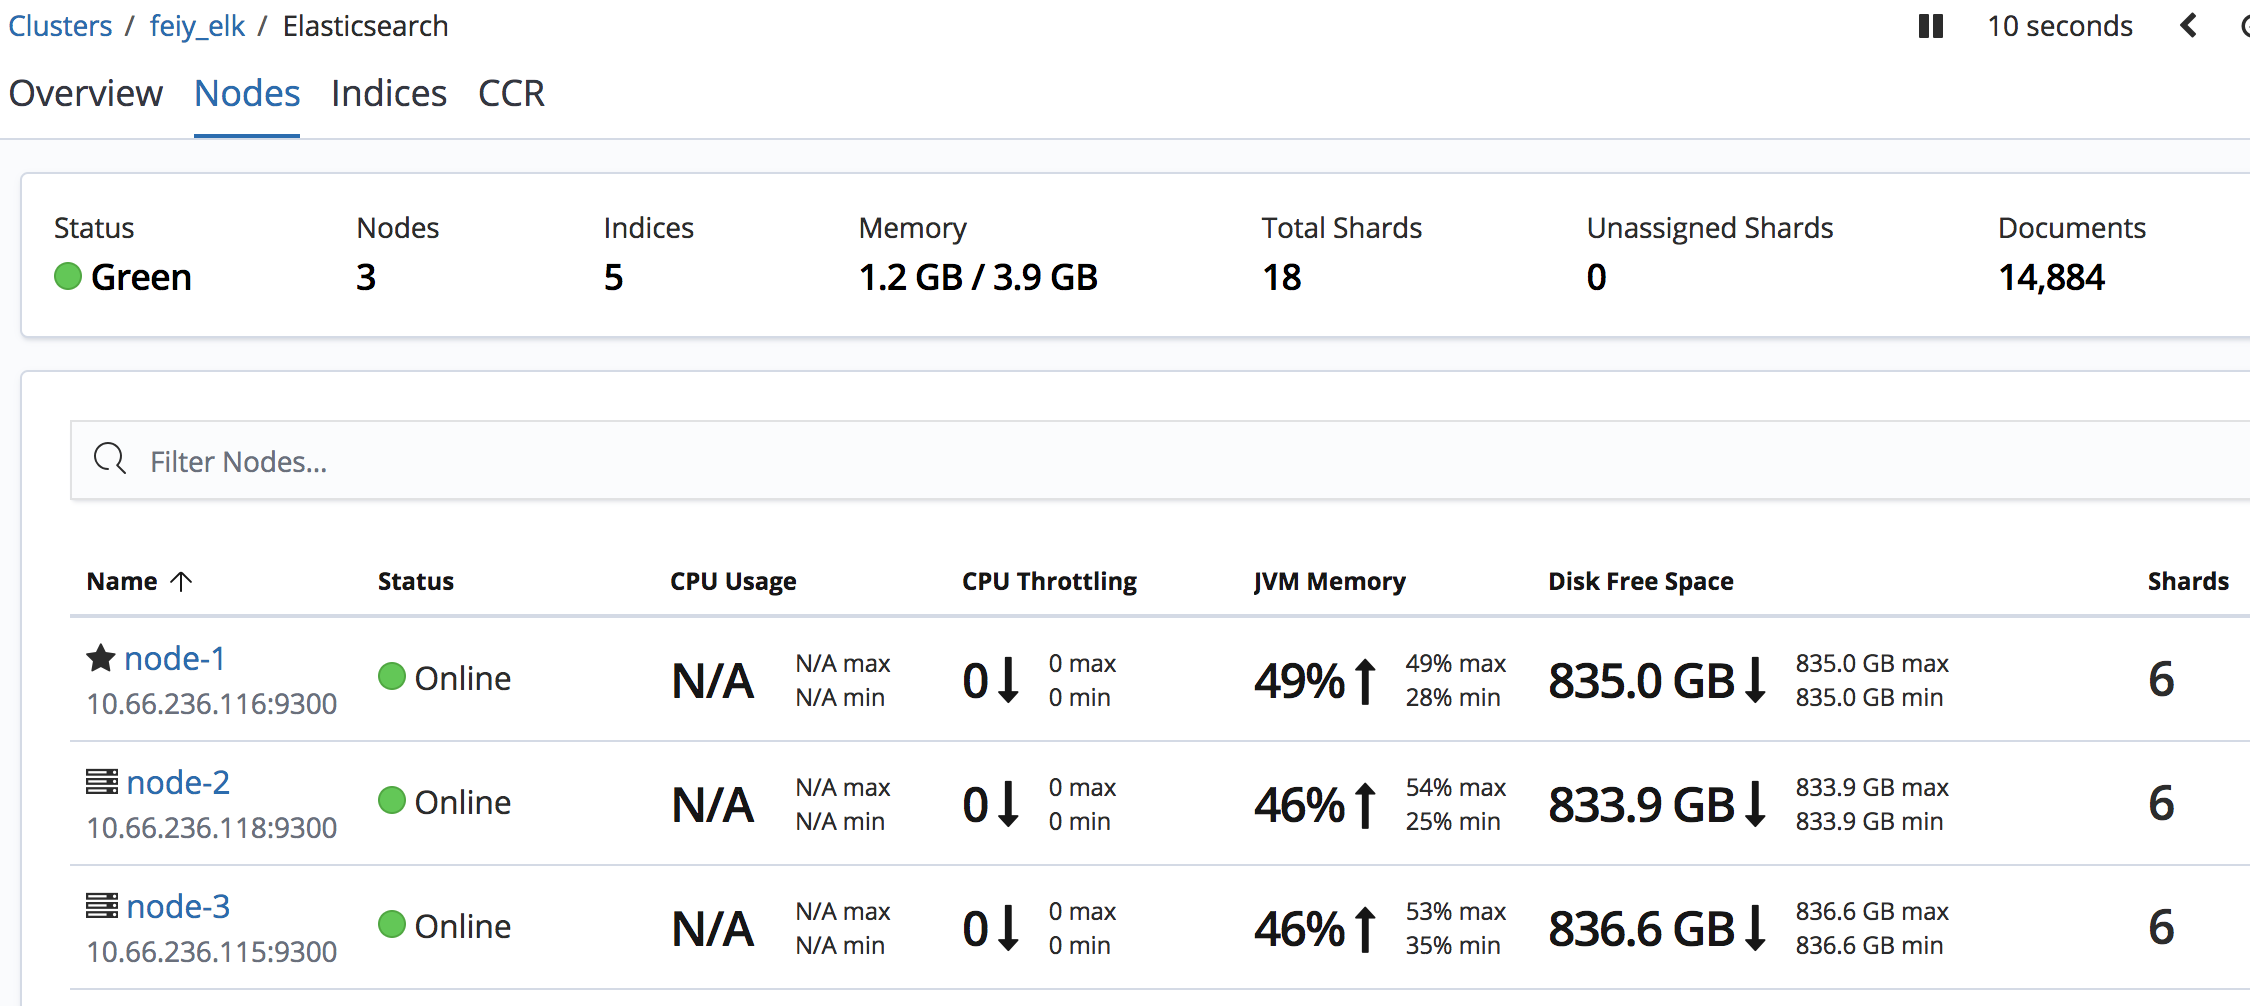
由于Elasticsearch是Java开发的,所以可以通过/etc/elasticsearch/jvm.options配置文件来设定JVM的相关设定。如果没有特殊需求按默认即可。 不过其中还是有两项最重要的-Xmx1g与-Xms1gJVM的最大最小内存。如果太小会导致Elasticsearch刚刚启动就立刻停止。太大会拖慢系统本身。 vim /etc/elasticsearch/jvm.options #JVM最大、最小使用内存
【注意】由于elasticsearch-head:5镜像对elasticsearch的7版本好像适配性不够,所以部分显示可能会有空白。推荐另外一个镜像lmenezes/cerebro,下载后执行docker run -d -p 9000:9000lmenezes/cerebro就可以在9000端口查看了。
############################# Server Basics############################# broker.id=0 ######################## Socket Server Settings######################## listeners=PLAINTEXT://192.168.108.200:9092 advertised.listeners=PLAINTEXT://192.168.108.200:9092 num.network.threads=3 num.io.threads=8 socket.send.buffer.bytes=102400 socket.receive.buffer.bytes=102400 socket.request.max.bytes=104857600 ############################# Log Basics############################# log.dirs=/var/log/kafka-logs num.partitions=1 num.recovery.threads.per.data.dir=1 ######################## Internal Topic Settings######################### offsets.topic.replication.factor=1 transaction.state.log.replication.factor=1 transaction.state.log.min.isr=1 ######################### Log Retention Policy######################## # The minimum age of a log file to be eligiblefor deletion due to age log.retention.hours=168 # The maximum size of a log segment file. Whenthis size is reached a new log segment will be created. log.segment.bytes=1073741824 # The interval at which log segments are checkedto see if they can be deleted according # to the retention policies log.retention.check.interval.ms=300000 ############################# Zookeeper############################# zookeeper.connect=192.168.108.200:2181,192.168.108.165:2181,192.168.108.103:2181 # Timeout in ms for connecting to zookeeper zookeeper.connection.timeout.ms=6000 delete.topic.enable=true ######################## Group CoordinatorSettings ########################## group.initial.rebalance.delay.ms=0
dataDir=/opt/zookeeper # 这时需要在/opt/zookeeper文件夹下,新建myid文件,把broker.id填写进去,本次本节点为0。 # the port at which the clients will connect clientPort=2181 # disable the per-ip limit on the number of connections since this is a non-production config maxClientCnxns=100 tickTime=2000 initLimit=10 syncLimit=5 server.0=192.168.108.200:2888:3888 server.1=192.168.108.165:2888:3888 server.2=192.168.108.103:2888:3888
ES_HEAP_SIZE Elasticsearch will assign the entire heap specified in jvm.options via the Xms (minimum heap size) and Xmx (maximum heap size) settings. You should set these two settings to be equal to each other. Set Xmx and Xms to no more than 50% of your physical RAM.the exact threshold varies but is near 32 GB. the exact threshold varies but 26 GB is safe on most systems, but can be as large as 30 GB on some systems. 利弊关系: The more heap available to Elasticsearch, the more memory it can use for its internal caches, but the less memory it leaves available for the operating system to use for the filesystem cache. Also, larger heaps can cause longer garbage collection pauses.
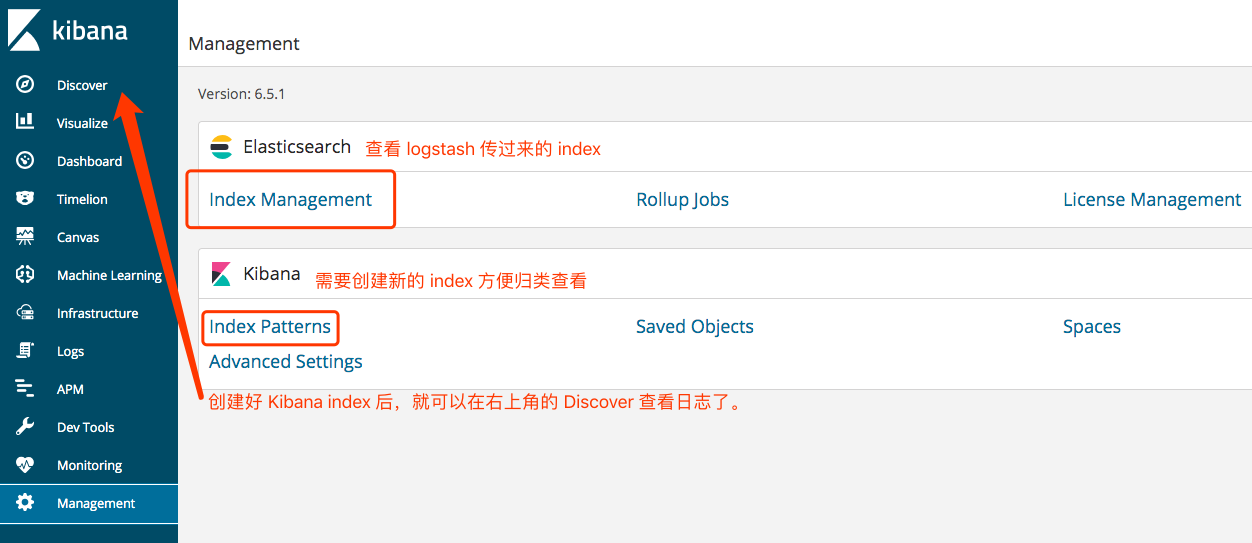
Quick intro to the UI The Console UI is split into two panes: an editor pane (left) and a response pane (right). Use the editor to type requests and submit them to Elasticsearch. The results will be displayed in the response pane on the right side.
Console understands requests in a compact format, similar to cURL:
1 2 3 4 5 6 7 8
# index a doc PUT index/type/1 { "body": "here" }
# and get it ... GET index/type/1
While typing a request, Console will make suggestions which you can then accept by hitting Enter/Tab. These suggestions are made based on the request structure as well as your indices and types.
A few quick tips, while I have your attention
Submit requests to ES using the green triangle button.
Use the wrench menu for other useful things.
You can paste requests in cURL format and they will be translated to the Console syntax.
You can resize the editor and output panes by dragging the separator between them.
Study the keyboard shortcuts under the Help button. Good stuff in there!
Redis is often referred as a data structures server. What this means is that Redis provides access to mutable data structures via a set of commands, which are sent using a server-client model with TCP sockets and a simple protocol. So different processes can query and modify the same data structures in a shared way.
Data structures implemented into Redis have a few special properties:
Redis cares to store them on disk, even if they are always served and modified into the server memory. This means that Redis is fast, but that is also non-volatile.
Implementation of data structures stress on memory efficiency, so data structures inside Redis will likely use less memory compared to the same data structure modeled using an high level programming language.
Redis offers a number of features that are natural to find in a database, like replication, tunable levels of durability, cluster, high availability.
Another good example is to think of Redis as a more complex version of memcached, where the operations are not just SETs and GETs, but operations to work with complex data types like Lists, Sets, ordered data structures, and so forth.
If you want to know more, this is a list of selected starting points:
################################## INCLUDES ################################### # 这在你有标准配置模板但是每个 redis 服务器又需要个性设置的时候很有用。 include /path/to/local.conf include /path/to/other.conf
################################ GENERAL #####################################
# 设置 1 或另一个设置为 0 禁用这个特性。 # Setting one or the other to 0 disables the feature. # By default min-slaves-to-write is set to 0 (feature disabled) and # min-slaves-max-lag is set to 10.
[root@sg-gop-10-71-12-78 redis-6389]# cat check_redis.sh #!/bin/bash # Check if redis is running, return 1 if not. # Used by keepalived to initiate a failover in case redis is down
REDIS_STATUS=$(telnet 127.0.0.1 6389 < /dev/null | grep "Connected" ) if [ "$REDIS_STATUS" != "" ] then exit 0 else logger "REDIS is NOT running. Setting keepalived state to FAULT." exit 1 fi
Host bastion_GOP_SG_NC_MAIN HostName 8.8.8.8 port 22 User wangao
CheckHostIP no,禁用 known_hosts 检查 Directs ssh to additionally check the host IP address in the known_hosts file.
StrictHostKeyChecking no,跳过 known_hosts 写入 Specifies if ssh should never automatically add host keys to the ~/.ssh/known_hosts file, and refuses to connect to hosts whose host key has changed.